Background Virtual Dimensions will change the game of Analysis with Planning Analytics (Powered By TM1) You can use Product, Customer or Employee Attributes in your slice/dice/pivot tools as ‘Virtual Dimensions’ without having to physically define them as a dimension when creating the cube You can add virtual dimension at any time after the cube exists, so your analysis opportunities are endless ...
Background
- Virtual Dimensions will change the game of Analysis with Planning Analytics (Powered By TM1)
- You can use Product, Customer or Employee Attributes in your slice/dice/pivot tools as ‘Virtual Dimensions’ without having to physically define them as a dimension when creating the cube
- You can add virtual dimension at any time after the cube exists, so your analysis opportunities are endless
- Cubes can now be half the size and twice as fast bec
ause you don’t need physical dimensions to drive analysis - And further, you can add fresh new data to your analysis ‘On the Fly’ with no disruption to Cube Structure, Business Rules, or Processes
- Tremendous flexibility to react quickly to market change
- e.g. If you have 3 attributes to a Product dimension, then those 3 attributes can be converted into 3 Virtual dimensions and can be used on any existing cube which has the Product dimension attached to it
Virtual Dimension through TI
- IBM has introduced 52 new TI Functions for managing Virtual Dimensions
- They all are very much similar to Dimension Manipulation functions except the word “Dimension” is replaced with “Hierarchy”
- Virtual Dimensions can be created through Workspace as well but it creates a flat 3 level structure
- Whereas with the TI we have more control and can customize the Virtual Dimensions
Scenario
I have an Employee Dimension which looks like below

The size of this Employee Dimension is about 344KB. Which is inside the Data Folder
![]()
I want to create a virtual dimension which is based on “Hire Date” Attribute of this Employee Dimension
Before we go deep into the TI functions, let’s see the difference between the virtual dimension created through TI vs Workspace
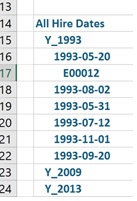
Through TI
4 Levels – All, Year with “Y_” as Prefix, Attribute Value and the Employee ID
I have my consolidated element called as “All Hire Dates”

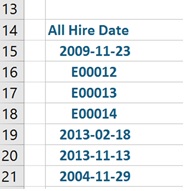
Through Workspace
3 Levels – All, Attribute Value and the Employee ID
Consolidated element is same as the Attribute Name – “All Hire Date”

Now here's the TI code:
Created a new TI Process with “None” as Datasource Type and have written all of the below code in the Prolog tab
# Define Constant Variables
#~~~~~~~~~~~~~~~~~~~~
cDimName = 'Employee' ;
cHierName = 'Hire Date' ;
cConsolidatedElName = 'All Hire Dates' ;
# Create Virtual Dimension and add Consolidated element
#~~~~~~~~~~~~~~~~~~~~~~~~~~~~~~~~~~~~~~~~~~
HierarchyCreate( cDimName , cHierName ) ;
HierarchyElementInsert( cDimName, cHierName, '' , cConsolidatedElName , 'C' ) ;
# Loop the Employee Dimension
#~~~~~~~~~~~~~~~~~~~~~~~~
i = 1 ;
nDimSize = DIMSIZ( cDimName ) ;
WHILE( i <= nDimSize ) ;
sEle = DIMNM( cDimName , i ) ;
# Get only the N level Elements from Employee Dimension
# Get the Attribute Value
# Find the position of “-“
# Find the length of element
#~~~~~~~~~~~~~~~~~~~~~~~~~~~~~~~~~~~~~~~~~~~~~
IF( DTYPE( cDImName , sEle ) @= 'N' ) ;
sGetAttrValue = AttrS( sDimName , sEle , 'Hire Date' ) ;
nFindDash = SCAN( '-' , sGetAttrValue ) ;
nEleLen = LONG( sEle ) ;
# The fifth character of the attribute value has to be “-“ and the total length of element should be 6
#~~~~~~~~~~~~~~~~~~~~~~~~~~~~~~~~~~~~~~~~~~~~~~~~~~~~~~~~~~~~~~~~~~~~~~
IF( nFindDash = 5 & nEleLen = 6 ) ;
# Attribute value can be blank
#~~~~~~~~~~~~~~~~~~~~~~
IF( sGetAttrValue @= '' ) ;
sAttrValue = 'Blank' ;
sParent = 'Y_Blank' ;
ELSE ;
sAttrValue = sGetAttrValue ;
sParent = 'Y_' | SUBST( sAttrValue , 1 , 4 ) ;
ENDIF ;
# Adding Elements
#~~~~~~~~~~~~~~
HierarchyElementInsert( cDimName, cHierName, '' , sEle , 'N' ) ;
HierarchyElementInsert( cDimName, cHierName, '' , sAttrValue , 'C' ) ;
HierarchyElementInsert( cDimName, cHierName, '' , sParent , 'C' ) ;
# Adding Components
#~~~~~~~~~~~~~~~
HierarchyElementComponentAdd( cDimName, cHierName, sAttrValue , sEle , 1 ) ;
HierarchyElementComponentAdd( cDimName, cHierName, sParent , sAttrValue , 1 ) ;
HierarchyElementComponentAdd( cDimName, cHierName, sConsolidatedElName, sParent , 1 ) ;
ENDIF ;
ENDIF ;
i = i + 1 ;
END ;
######################################################################################
Note:
Note 1: After the Virtual Dimension is created, a folder is created inside the Data Folder called “Employee}hiers”
![]()
Note 2: And inside this folder all the virtual dimensions created through this Employee dimension will be placed
The “Hire Date” Virtual Dimension I just created is inside this folder as .dim file

Note 3: Virtual Dimensions can ONLY be accessed through PAx Exploration and Quick Repot Modes, and Workspace
Note 4: You would need to add a new parameter called “EnableNewHierarchyCreation=T” in the TM1 Config File

Written by:
Sameer Syed [Senior TM1 Consultant]
.jpg?width=200&name=logo%20(1).jpg)

we go the extra mile so you can go the distance|
Got a question? Shoot!
Lorem ipsum dolor sit amet, consectetur adipiscing elit, sed do eiusmod tempor incididunt ut labore et dolore magna aliqua.


.png?width=673&height=371&name=IBM_Gold-removebg-preview%20(1).png)
Leave a comment